Wednesday, January 9

Chuck Wendig On Writing: How He Writes A Novel

Chuck Wendig On Writing: How He Writes A Novel

The Terrible Mind of Chuck Wendig


Late yesterday I wrote a short post about Chuck Wendig's fun writing challenge and someone joked I should write about how he works his writerly magic.

I LOL'd back and didn't think much more of it until I saw Chuck had written an article on editing. Oh! I thought. This will be interesting. THEN I found out he'd written about ... drum roll ... how he writes a novel!

It was like the sky split open and trumpets sounded. How could I not write about that?

(All quotations, unless stated otherwise, are from Chuck's blog post: How Chuck Wendig Writes A Novel.)


1. The Right Idea


Every story begins with an idea. But not just any idea. It has to be the right idea.

How do you know which one is right?

Chuck puts his ideas through a kind of interrogation. I'm not sure what he does with the ones that don't make it and I'm sure it's better that way.

The right idea will be:
a) interesting to me beyond the moment in which they are conceived
b) potentially interesting to other humans who are not me
c) potentially interesting to the giant amorphous blob known as the “publishing industry”
d) about a character in a world and not just a world
e) and de actionable, meaning, an idea that suggests a book I’m actually capable of writing
The idea that makes it through the final inerview goes on Chuck's "idea list". He writes:
[L]ater I dump it into a file I’ve created that’s meant to be a storehouse of such potential ideas. For the record, this dump file now looks like the warehouse at the end of Raiders of the Lost Ark. Shelves and shelves of crates and boxes, each a mystery container whose story remains untold.
If I could make a humble suggestion: Dropbox and Google Drive are your friends.

If you keep your important lists in the cloud, you're guaranteed to have an updated version of the lists on your computer(s) as well as in the cloud (wherever that is) so even if the worst happens and all your electronic devises spontaneously combust you'll still have your ideas, your stories and your Excel worksheets.


2. Barf Up A Blob Of Incoherent Thoughts


I love Chuck's headings. I mean, right off, you knew that was his, right?

Anyway, the second step is to get your thoughts out of your head and out into the world: put them on a sheet of paper, virtual paper, spreadsheet programs, mind-maps, whatever works for you. As Chuck writes:
The notes taken at this stage are almost stream-of-consciousness. Sentence fragments, mis-spelled words, grocery list thoughts interspersed in the middle, whatever. It’s just to ruminate on the idea. And it’s also to test the idea in a way. Is there more here than than initial idea? A great many ideas are dead seeds planned in fallow ground — they won’t grow a good goddamn thing. So, this stage of the game is very much about seeing if this thing has legs. Will it walk? Can it run?

3. Get To Know Your Characters


Chuck calls characters "The way through every story". You need to know who a character is in the same way you need to know what the story is about (we'll get to that in a moment).

a. Name your characters


Names have power. I find it difficult to write about a character before I have some idea what her first name is. Last names are the trickiest, often they won't come to me until I'm working on my second or third draft.

Naming resources:
- Websites for baby names
- Google Map street names
- Scrivener
- US census data
- Movie credits
- The names of characters from other books, mixed and matched.

b. Take your characters out for dinner and get to know them


For each character ask:
- What are his wants? (Both conscious wants and unconscious.)
- What are his needs?
- What are his fears?
- Why does he need to keep going?
- What goal will drive him as he progresses through the story?
- What obstacles are in his path? Which obstacles will prevent him from reaching his goal?

Some of these obstacles MUST be bound up with what the character fears.

c. Create a simple character arc: Beginning, middle, end


Chuck writes:
Finally, I do a little three-beat character arc for the character. Three words or sentences that are meant to indicate the state of the character across the story — beginning, middle, and end.

Poor cat down on his luck wants to see a change in this country –> elected president, way over his kitty head –> once again a poor cat but now knows the intimate details of the democratic process and oh did I mention he nuked the middle of our own country into oblivion.

d. The test: Are your characters compelling?


Some writers want their characters to be likable. Chuck doesn't. He wants characters that are interesting, readable and, above all, compelling.

Why do you find your character compelling? What are they good at? What have they failed at? What events have made them who they are?


4. Ask The Foundational Question: What Is Your Story About?


Answering this question will help you begin to not only lay the foundation of your story, but it will also test your story idea to make sure it's really one you want to spend months of your life with.

Here is the big question:

What is your story about?

I love examples, don't you? So, before we go any further, here are examples of what Chuck means when he asks: What is your story about?
“This is about how you can’t escape your past.”
“This is about just how fucked up people can be.”
“This is about how the education system fails its kids by adhering to antiquated ideals and stats that don’t mean anything and notions of ‘learning’ that remain separate from notions of ‘humanity.’”
“This is about the coming of age of MONKEY SQUID DEATH WOMBAT. Raaaaar!”
I tend to think of stuff like this as THEME. Just the other day someone asked whether he should know the theme of his story before he started to write or if it could be worked into the story later.

If I remember what he wrote in On Writing, Stephen King often doesn't know what his story is about until the second draft. The theme is there, but he hasn't discovered it yet.

Chuck Wendig is definitely a know your theme first kinda guy and I do see his point.


Why you want to know what your story is about before you begin writing


In his article Before You Start Writing, Ask: “What Is This About?”Chuck points out that knowing your theme before you start writing has a number of benefits.

i. It will tell you why you are writing this story


Answering the question, What is this story about?, will tell you what you want to say.

In order for the story to work you need to write about something more than what interests you, you need to write about what compels you, what haunts you.

ii. Binds your story elements together


Knowing what the story is about will tell you why you're writing it and THAT is the mortar which binds your story elements together. Chuck writes:

Point is, the web, the structure, the whole recipe comes together when you have this answer. You can look at the whole picture, nod, and just say, “Ohhhh.”

iii. Gives you a thread


Knowing what your story is about is like being handed a magical thread that will help you find the way through the labyrinth of your story. It will help you decide what to do.

Just as in a labrynth you need to decide, "Do I go right, left or straight?" when you write you're going to be presented with choices. How does a particular character react to such-and-such? How does she respond when she fails to achieve one of her goals?

Knowing what the story is about will help you understand what needs to happen next, where to turn, how to proceed.

iv. The test: How you know if you've found out what your story is about


If the answer to, "What is your story about?" doesn't get you excited, if it doesn't connect with you emotionally, then that's not your answer. Keep excavating. Chuck writes:

If you don’t love the answer, and that answer doesn’t get you all jizzity-jazzed about the process of writing this thing, then ... that’s not your answer. The answer needs to engage you. It needs to excite you. It needs to give you purpose and be the lash on your ass-cheeks to spur you forward. (Before You Start Writing, Ask: “What Is This About?”)
Now let's move on to talk about how we can discover what our story is about, how we can discover our story's theme.


5. The Marvels Of Mind-Mapping


At this point we've got some character sketches and, maybe, a vague idea of what our theme is but nothing we can pin down. What we need is a much clearer idea of what brings all these disparate elements together. We need a handle on what our story is about. What is its theme?

We need to create a mind-map.

What the heck is a mind-map?


Chuck has written an excellent article on this: Who The Hell Are These People? Mind-Mapping Your Story’s Characters. In that article he has embedded an image of a mind-map he created. You can get there through Chuck's article or you can click here. Here's how Wikipedia describes a mind-map:
A mind map is a diagram used to visually outline information. A mind map is often created around a single word or text, placed in the center, to which associated ideas, words and concepts are added. Major categories radiate from a central node, and lesser categories are sub-branches of larger branches. Categories can represent words, ideas, tasks, or other items related to a central key word or idea. (Mind map)

Why use a mind-map?


- It's easy, fun, gives you a lot of information at a glance.
- It is simple to do and can be done anywhere (you can do it on your smartphone).
- It helps you explore character without locking you into anything. It doesn't feel as serious, as written in stone, as when you're sitting at your desk typing away.
- It can help you spot themes, a deeper storyline.

It's this last point I want to spend a moment on. Chuck writes:
I was going through the characters [using a mind-map], and I started to see some similar elements pop up: elements of legacy, of family, of blood. And I was like, holy shit, I just figured out what this whole story’s *about.* I mean, I had the story in mind. I know a rough sequence of events for the plot. But I didn’t really have a deeper throughline.

And in the mind-map, the character’s exposed themselves (tee-hee) and showed me the theme of the piece.

Just through the act of dicking around with fun little word bubbles and connective tissue, I suddenly stumbled upon one of my great unanswered questions, a question I didn’t think I’d answer so soon.

That’s the joy of the preparation process. It’s like preliminary archaeology. You dig and dig and uncover things you never expected to find. (Who The Hell Are These People? Mind-Mapping Your Story’s Characters)
Sounds great!

I've never used a mind-map before but after reading Chuck's articles I'm going to give it a try.

One of the benefits of using a mind-map is that you can get an app for your phone and do it anywhere. Chuck even recommends an app: SimpleMind.


6. Write A Pitch


I was excited when I read this, because it's what I've been saying in my Starburst Series! 

a. Write a logline/elevator pitch


Sum your entire novel up in a single sentence. Chuck uses his 'cat for president' story idea as an example:
A cat is elevated from poverty and is elected president only to learn that cats shouldn’t ever serve in public office because cats are assholes.

b. Write a blurb


Write a longer pitch of under 500 words. Basically you want a longer version of the blurb for the back cover of your book without giving spoilers. But this should be easy since you don't know exactly what's going to happen.


7. Build A World, But Be Like Scrooge


Chuck cautions that writers should do only as much work as you have to in order to begin writing. You don't know what material is going to get cut so only do the bare minimum.

For instance, in one story I'm working on I knew I needed a slow moving mammal but I didn't know what kind would fit so I just wrote <slow moving mammal> in my first draft and moved on.


8. Know Your Beginning And Your End


Figure out how your story begins as well as how it ends. Chuck writes:
Here’s why I like to have the beginning and the ending in mind: because as I write, my eventual outline will fail me. It just will. No plan survives contact with the enemy and eventually I’ll be somewhere in the middle of the book, spinning wildly in the swampy mire of my own fiction not sure exactly what to do next. And when that happens I will look to the ending and I will say, “I need to go there,” and then I will march the story toward that point and eventually get the outline (which by now may require modification) back on track.

Make sure there is an element that links your beginning and your ending


This element could be elemental, thematic or physical. For instance,
In the Mookie Pearl short story, “Charcuterie,” it begins and ends with him pulling up at the bar with his friend and boss, Werth.

9. Outline


Chuck Wendig uses a four act structure. Christopher Vogler uses four as well but Michael Hauge uses three. TV has gone to a six act structure. It's up to you, whatever works.

Write the key scenes first


Chuck figures out what needs to happen in the story (something which is much easier to do if you have an ending!) and then writes those key scenes.

Write the dramatic scenes second


Also, there may be a few different kinds of scenes you want to enclude such as a:

- reversal of fortune
- a key betrayal
- a battle scene
- a moment of shock or, as Chuck puts it:
I’m also always on the look out for at least one HOLY SHIT NO HE DIDN’T moment — some jaw-dropping pants-crapping event or revelation in the narrative that sticks you in the ribs with a story shiv. I like those moments. One of my favorite things is obliterating reader expectations in one fell swoop.

10. Let It Sit


At this point you've got a fat-ish folder, either physical or electronic, and you may need to let the story sit for a bit before you nail yourself to your chair and write it.


11. Spreadsheets Are Your Friends


Chuck Wendig keeps his writing schedule in an Excel spreadsheet. He writes:
One spreadsheet I particularly require is the one that keeps all my writing schedule on it. I don’t use a calendar — I use Excel. I have the whole year planned out in terms of when my deadlines are and where the books slot in. (Then I also identify gaps and, ideally, figure out how to best use those gaps.)
Mark down when your writing projects need to be completed then write down how much you know you can finish per day (underestimate a little to give yourself a bit of wiggle room) and figure out how much time you'll need to complete each one.

For me, it's not so much the writing that takes time, it's the editing. My rule of thumb is that for every hour writing I reserve 4 hours for editing. (Of course I never edit what I just wrote! Gah! The very thought burns!) I'm learning--or trying to learn--how to juggle multiple projects at different stages of completion.

Also, on your spreadsheet keep track of both your projected and your actual word count.


12. Write


Chuck writes:
I write. I write with my head down. I write linearly, first page to the last page. I write without listening to the doubting voice that tells me I’m a total asshole for even trying this. I write without regard to safety or sanity. I write with the freedom to suck and the hope that I don’t. I write to finish the shit that I started.

That's (basically) it! Chuck Wendig has written another article on how he edits his stories and you can find that here: How Chuck Wendig Edits A Novel.

This was a gargantuan article! Sorry about that. I try to keep my blog posts to 1,000 words or less but I'm in the process of writing three different series and I didn't want to add a fourth, so I wanted to get this post done today.

I'll be briefer tomorrow. :-)

Other (much shorter!) articles you might like:

- Using Excel To Outline Your NaNoWriMo Novel: Defeating the sprawl
- Mary Robinette Kowal and The Mysteries of Outlining
- The Starburst Method of Writing

Photo credit: "Free Old Converse All Stars Creative Commons" by Pink Sherbet Photography under Creative Commons Attribution 2.0.

Tuesday, January 8

Chuck Wendig's Flash Fiction Challenge

Chuck Wendig's Flash Fiction Challenge

I just learnt about Chuck Wendig's Flash Fiction Challenge from a nice person in John Ward's Writer's Discussion Group

It's a fun challenge that doesn't take a lot of time since your story has to be under 1,000 words. It's nice to write something one can (theoretically!) write and edit in a few hours.

Here are the rules (I've copied this from Chuck's website, terribleminds):
I’m going to give you three categories. You will pick randomly from each category, maybe with a d10 or using a random number generator. From your choices, you’ll have 1000 words to write some flash fiction. Post this fiction at your online space. Link back here. Due by Friday, January 11th, at noon EST.
Chuck gives you a SUBGENRE a SETTING and an item or kind of thing your story MUST FEATURE. Actually, he gives you 10 in each category and then you randomly select one.

It's a fun idea! This way chances are everyone is writing a different kind of story with its own unique challenges. Here's the link if you're interested:


When you're done, don't forget to publish the story on your blog and leave the link in a comment to Chuck's post.

Other articles you might like:

- The Starburst Method: The Hero's Journey, Part 1
- How To Format A Word Document For Uploading To Amazon
- 19 Ways To Grow Your Twitter Following

Photo credit: "5:00am… Wake up before the sun, start to run." by Untitled blue under Creative Commons Attribution 2.0.

The Starburst Method: The Hero's Journey, Part 3

 The Starburst Method: The Hero's Journey, Part 3

Today I'm going to do what I promised yesterday and step us through the rest of our five paragraph summary of the journey of your Hero and his band of intrepid adventurers.

Below are links to the previous articles in this series, something I'm calling The Starburst Method, though I've been thinking of changing the name to something more descriptive. The Sculpting Method or perhaps The Diamond Method.

Since this article is a continuation of the last two (The Starburst Method: The Hero's Journey), you may want to give them a quick read.

1. The Starburst Method: What It Is And What It Can Do
This gives a roadmap of where we're going and why we want to get there.

2. The Starburst Method: Discovering Your Characters 
We begin to get to know our characters, what they want, what they fear, what they do for a living, what their dreams are and, most importantly, what their goal is.

3. The Starburst Method: The Hero's Journey, Part 1
Here we go deeper into our characters and start transforming our knowledge into a narrative. We hone what we know about our characters until it can be expressed in five paragraphs that summarize our hero's journey.

4. The Starburst Method: The Hero's Journey, Part 2
A continuation of the ideas in (3).

Let's dive right in!


4. It All Falls Apart


Here we meet our antagonist.

Of course your antagonist has been around, in story terms, for some time. Probably ever since you entered the Special World. In fact, he was likely one of the first people your hero met, or heard about, when he entered the Special World. This is just the first time we're meeting him in our summary of your hero's journey.

Also, when I say it all falls apart I'm not talking about The Dark Night of the Soul or The All Hope Is Lost point that usually occurs about 3/4 of the way through a story. The 'All Hope is Lost' point occurs when the hero and his intrepid band of adventurers lumber up to the climax of the story and their Big Plan falls apart.

No, what I'm talking about here is the first sign of trouble. The first real resistance they face in the Special World. (Some would also call this a pinch point.)

For instance, in The Firm everything seems to be going great--Mitch McDeere, the protagonist, has a nice house, great car, awesome paycheck and he's on the fast track to becoming partner--then he discovers that the law firm he works for, Bendini Lamert & Locke, is a front for organized crime and he's in it up to his eyeballs.

At that moment Mitch's initial goal of becoming a wealthy lawyer dissolves and he gets his true goal, the Story Goal: Get away from the mob with his licence to practise law, and his marriage, intact.

This leads us to ...


5. The Challenge


How is our intrepid adventurer going to thwart the machinations of the antagonist? How is your hero going to get himself, and his friends, out of this big fat mess?

That's the story goal, the challenge. That's what we want to read about and it will form the heart of your story. (I feel as though there should be a drum roll at this point because, in a way, this is what the entire series has been leading up to.)

Yes, there will be hurdles the hero must jump, dangers to avoid, tests to pass--although he should fail at least one, and fail spectacularly--and so on, but it's all because of the hero's goal and the mess he's gotten himself and his friends into.

And why has he gotten himself into that mess? Because of who he is, because of what he wants, because of his Dream and, especially, his Goal.


An Example: The Firm


Yesterday I gave you an example of a five paragraph summary based on Star Wars IV: A New Hope, today I'll give you another. This one is based on The Firm.
1. Ordinary world

Mitch McDeere worked hard to get top grades at Harvard Law School because he never wanted to be poor again.

2. Characters and setting

Mitch would never have succeeded without the love and support of his beautiful wife Abby who, more than anything, wants him to stop running and accept who he is, and to accept his brother, even though his family is a reminder of what Mitch is running from: the shame of growing up in a trailer park, poor, raised by a mother who didn't really care about him.

3. Entering the special world 

When the lawyers from Bendini, Lambert & Locke offer Mitch more money than any other law firm it is a dream come true and he and Abby move into their brand new house, courtesy of the firm.

4. It all falls apart

Everything is great until Mitch learns about the secret files and discovers Bendini, Lambert & Locke is just a front for organized crime. As the FBI closes in on Mitch, threatening him with prison, the mob gets suspicious.

5. The challenge for the protagonist

Mitch has to rely on his wits to save himself and Abby. But is he up to the challenge?
By the way, I took that example from an earlier post I wrote: The Structure Of Short Stories: The Elevator Pitch Version.

What you have at this point--a five paragraph story summary--can form the skeleton of your story. We've met the main characters, or at least their archetypes. They need fleshing out and, as a result, your story skeleton will grow, change, bend, but as long as it remains roughly 'story shaped' (i.e., focused on the hero's goal, the hero's journey) it's all good.


To Be Continued


In our next and final section we'll look at condensing your story down into one or two sentences.

This is handy for two reasons:

a) You'll be able to determine what is really truely important in your story, and
b) If you ever have to write a pitch, you'll have your tag-line ready!

At this point, with your five point summary concluded, you already have a blurb for your book or the start of your pitch.

Update: Here is a link to the final installment of this series: The Starburst Method: Summarizing Your Story In One Sentence

Other links you might like:

- How To Format A Word Document For Uploading To Amazon: MS Word Styles
- The Starburst Method: The Hero's Journey, Part 2
- The Magic Of Stephen King: How To Write Compelling Characters & Great Openings

Photo credit: "Fire Storm" by JD Hancock under Creative Commons Attribution 2.0.

Monday, January 7

The Starburst Method: The Hero's Journey, Part 2

The Starburst Method: The Hero's Journey, Part 2

This is a continuation of my series on the Starburst Method:

- The Starburst Method: What It Is And What It Can Do
- The Starburst Method: Discovering Your Characters
- The Starburst Method: The Hero's Journey, Part 1

You don't have to read the previous articles to understand this one, though I would encourage you to read The Starburst Method: The Hero's Journey, Part 1 since this is a continuation of that material.


3. Entering The Special World


The Special World is different. We're not in Kansas anymore.

Whatever rules for acting, for getting ahead, your hero knew in the Ordinary World no longer apply. This is a different reality.

A popular way of demonstrating this strangeness is to test your hero with a series of trials, at least one of which he should fail miserably.

Bar scenes are great for demonstrating how alien the Special World is. Of course the setting doesn't have to be a bar, it can be any kind of watering hole, any place where a lot of different kind of folk meet and where it's easy for the crowd to get ... er ... lively. (Think of the bar scene in Star Wars IV.) This is where your hero can get a crash course on the new rules, the new conventions, as well as meet new friends, make enemies and generally get things moving.

Threshold Guardian


I think the concept of a threshold guardian is one of the most useful concepts in my writer's workbox. I suspect different folks think of the Threshold Guardian in different ways, and would give him different attributes, so what I say here pertains specifically to how I think of him.

So, preliminaries aside, what is a Threshold Guardian? Here's how I think of it: 
A Threshold Guardian is a force--usually a person--that tries to keep the status quo.

How A Threshold Guardian Operates In A Story


Let's back up a bit. When your hero is still lounging in the Ordinary World he'll receive what a lot of writers refer to as a Call To Adventure. This will be an invitation, a reason, for the hero to leave his current existence, his life as he knows it, and enter the strange wonderland of the Special World.

For instance--and I know I talk a lot about Star Wars IV, but, what can I say? I thought it was a great movie!--Obi-Wan Kenobi gives Luke a clear call to adventure when he invites him to learn the ways of The Force and travel to Alderaan.

Refusal of the Call is common too. Luke says, Thanks but no thanks. I can't go. I have responsibilities. I have to help out my uncle and aunt on their farm. And that's a perfectly good reason.

In a sense (this is what I'm going to argue, you might not agree with me) Luke's uncle fills the role of a Threshold Guardian. Why? Because Luke's uncle does everything he can to prevent Luke leaving the farm. Even Luke's aunt says to the uncle something to the effect: Why don't you just let Luke go? The uncle has the best of reasons, I'm sure, but he is like a jealous dragon guarding his treasure and Luke is on top of the pile.

But many different kinds of archetypes can be involved in a Call To Adventure. For instance, The Mentor. After the hero refuses the call often it's the mentor who gets him back on track. For instance, the Frog brothers in The Lost Boys were unlikely mentors to Sam Emerson. Also, though I won't go into it here, The Shadow and The Trickster can also, in their own distinctive ways, be effective Threshold Guardians.

What's the point?


The Threshold Guardian--regardless of which guise he appears in within your story (The Shadow, The Mentor, The Trickster, and so on)--is going to be a pivotal figure in moving your hero from the Ordinary World into the Special World.

Sure, Luke's uncle never got much screen time, but when it comes to why Luke accepted the Call To Adventure his uncle is the single biggest reason. It was his death, and that of his aunt, that both removed Luke's reason for refusing the call--the farm didn't exist anymore--and gave him a positive reason--avenge his relative's deaths by helping to destroy the Empire and, of course, Darth Vader--for taking up the adventure.

How this would this look: An example


Here's an example using--yes, you guessed it!--Star Wars IV:
1. Ordinary World

Whenever there was something that needed fixing around his uncle's farm Luke Skywalker was somewhere else racing his speeder dreaming of adventure.

2. Setting & Friends

Then he met two droids--one snarky and self-absorbed but loyal and the other quirky and full of heart but with a knack for finding adventure--who changed his life ...

3. Special World

... by leading him to mysterious old Ben Kenobi who the droids referred to as Obi-Wan Kenobi.

Obi-Wan Kenobi tells Luke he used to teach his father before his father was killed by a minion of the Emperor: Darth Vader. Obi Wan offers to train Luke in the way of The Force and take him on a quest to save the Rebel Alliance and help defeat Darth Vader and, ultimately, the evil Empire.

Luke would love to accept but he declines because his uncle and aunt need his help to run the farm.

When the Emperor's minions kill Luke's uncle and aunt and obliterate their farm Luke swears vengeance and, taking up his father's lightsaber, asks Obi-Wan Kenobi to be his teacher.

4. It All Falls Apart

When our intrepid band of unlikely adventurers spots an enormous planet destroyer known as the Death Star they come to the attention of the being, now more machine than man, who killed Luke's father: Darth Vader. With their ship impounded, Obi Wan dead and an ungrateful princess on their hands, how will they ever save themselves let alone the rebel alliance?

5. The Challenge

Luke and his not-so-merry band of adventurers have to overcome nearly insurmountable obstacles if they are going to rescue the princess. Can they learn to work together in time to save the rebel alliance, defeat the Empire and save the universe?
Or something like that! I wrote this example in 15 minutes so I'm sure you can do better. Hopefully you can see what I've been talking about as well as where we're headed.

I had wanted to get through parts four and five today but it looks like that's not happening! Tomorrow, even if the post is a bit long, I'll get through this Hero's Journey section. Promise!

Update: Here is a link to the next article in this series: The Starburst Method: The Hero's Journey, Part 3. (And I do keep my promise!)

Other articles you might like:

- The Starburst Method: Discovering Your Characters
- How To Format A Word Document For Uploading To Amazon
- The Magic Of Stephen King: An Analysis Of The Opening Paragraphs Of The Dead Zone

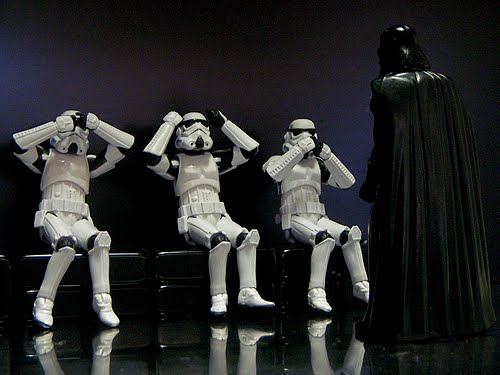
Photo credit: "See No Vader, Hear No Vader, Speak No Vader" by JD Hancock under Creative Commons Attribution 2.0.
Sunday, January 6

The Starburst Method: The Hero's Journey, Part 1

The Starburst Method: The Hero's Journey, Part 1

I'm going to continue my Starburst Method series today, but first I'd like to say a few words about Hugh Howey's book Wool and why we write. If you'd like to skip to where I start talking about the Starburst Method scroll down to the heading "The Starburst Method, Continued".


Hugh Howey and Wool


I started reading Wool yesterday and was amazed by the story. Hugh Howey's characters and events are emotionally compelling. The world of Wool is stark, filled with unpleasant realities, but the characters refuse to give up, they refuse to abandon their humanity.

Here's HH's dedication:
This collected work is dedicated to anyone who dares dream of a better place.
When I read that something clicked for me.

Wool is more than a book. It tells the story of a Silo and the people who live within its metal grip but, somehow, Hugh Howey has managed to do what all great authors have done since time immemorial, he has reached beyond himself, beyond his story, and connected with something universal.

I'm bringing this up because I don't want to lose sight of this aspect of the craft.

What I talk about in these essays—the questions I present ("What is your character's goal?"), the formulae—are meant to be intuition pumps, to help get us thinking in terms of story, they can't be the whole kit and caboodle.

Okay, now let's continue on with our series.


The Starburst Method, Continued


This post is part of a series about a method I'm calling the Starburst method. You can read the first two chapters here:

1. The Starburst Method: What It Is And What It Can Do
2. The Starburst Method: Discovering Your Characters

I wonder if "Starburst" doesn't give a misleading impression because instead of starting with something small and rapidly expanding we're starting with something big and nebulous—our relatively unfiltered and perhaps contradictory ideas for a story—then honing them.

Perhaps this method is more like sculpting, cutting away parts that don't belong and adding ones that do.


Five Paragraphs: Setting Up The Story


Today we're condensing our story down into five paragraphs. By the end, ideally, we will have reduced each paragraph to a single sentence. Each paragraph represents one stage of the hero's journey.

Let's go through them.


1. The Ordinary World


1.a. How is your hero DISTINCTIVE?


Christopher Vogler writes:
Most stories take the hero out of the ordinary, mundane world and into a Special World, new and alien. This is the familiar "fish out of water" idea which has spawned countless films and TV Shows (... The Wizard of Oz, Witness, ... Trading Places, Beverly Hills Cop, etc.).

If you're going to show a fish out of his customary element, you first have to show him in that Ordinary World to create a vivid contrast with the strange new world he is about to enter. (The Writer's Journey)
Last time we started to get acquainted with our protagonist. Although we don't know everything yet we have an idea what he does for a living, his name, his special ability as well as his weakness, and so on.

Here's another question: In the ordinary world, where your hero isn't perhaps very heroic, what is the most distinctive thing about him or her?

Is he a troublemaker? If so, quickly write down an example, something that shows he's a troublemaker, a malcontent.

Or perhaps your protagonist is much too much caught up in what society expects of him.

Or maybe he is hopelessly in love with someone unattainable.

Think of some one thing that your character is noteworthy for, that makes him distinctive. That sets him apart from everyone else. What is it that makes the other characters in your story care about him? (They may want to murder him, but that's still a kind of caring! He influences the actions of others.)

For instance, Nathan Bransford in the query letter for his book, Jacob Wonderbar and the Cosmic Space Kapow, had this to say about his protagonist:
Jacob Wonderbar has been the bane of every substitute teacher at Magillan Middle School ...(My Query Letter for JACOB WONDERBAR)
In only a few words NB paints a clear picture of his hero.

1.b. How is your hero TRAGIC?


That's the first part, setting your hero, your protagonist (I'm using those words interchangeably) as distinctive. Now we need to explain his uniqueness.

There's another part to being a hero, the tragic bit. Many, perhaps most, heroes have something very wrong with their lives, some tragedy. This tragedy can perhaps help explain why he is distinctive in the way he is.

For instance, if your hero is a thief perhaps it's because his parents died when he was a child and he had to raise himself on the streets.

This is how Nathan Bransford put it:
Jacob Wonderbar has been the bane of every substitute teacher at Magellan Middle School ever since his dad moved away from home. (My Query Letter for JACOB WONDERBAR)
Jacob is a terror at school but we get the idea that's partly because of his dad's absence. That one sentence encapsulates, summarizes, gives us a snapshot of the hero's distinctive challenges and character.


2. Friends and Helpers


Everybody needs somebody, even heroes. Who are your protagonist's friends and helpers? What do they do for the hero? What are their weaknesses?

In Lord of the Rings Pippin and Merry are troublemakers. They love eating (they could eat their weight in lembas!) and smoking 'leaf' and they nearly get Frodo killed more than once, but no one could fault heir bravery when a friend was in danger.

Here's what Nathan Bransford wrote about Jacob's friends:
He never would have survived without his best friend Dexter, even if he is a little timid, and his cute-but-tough friend Sarah Daisy, who is chronically overscheduled.
 Again, this paints a compelling picture.


To Be Continued


Tomorrow we'll continue this series and finish fleshing out our five paragraph summary. See you then!

What are you writing about at the moment? What makes your protagonist distinctive? Does she have a tragic past? Who are her friends? What are her friends' weaknesses? What can her friends do well?

Other articles you might like:

- How To Format A Word Document For Uploading To Amazon: MS Word Styles
- How To Format A Word Document For Uploading To Amazon
- The Starburst Method: Discovering Your Characters

Photo credit: "Superlative Beauty // Footsteps of Happiness // Wonderful Moments // The Shelbourne, A Renaissance Hotel Dublin, Republic of Ireland // The Grand Staircase // ENJOY!" by || UggBoy♥UggGirl || PHOTO || WORLD || TRAVEL || under Creative Commons Attribution 2.0.

Saturday, January 5

How To Format A Word Document For Uploading To Amazon: MS Word Styles

How To Format A Word Document For Uploading To Amazon: Word Styles

My apologies for all the posts today, but I didn't want to include step-by-step tutorials in this blog post so I made three separate posts. This post is a continuation of my series: How To Format A Word Document For Uploading To Amazon.

Let's look at how we can use styles in MS Word to drastically cut down on the amount of time we spend formatting a document. Doing it this way has not only saved me time it has saved me much frustration. For instance, when I publish on Smashwords, I get through the notoriously ravenous Meatgrinder, unscathed, on the first try.

By the way, I'm using MS Word 2007 so all my instructions are for that version of Word.


MS Word Styles 101


All the styles I use build on the Normal style, so the first thing I do is make sure that the Normal style is exactly how I want it.


Modify The Normal Style: Default Settings


Keep in mind that this is just what I do. This isn't the only way of using Word to format a document, but it's what works for me. If something else is working for you, use that. (And please tell me what it is in the comments! I love learning new things.)

If you'd like to step through the following with me but you don't know how to modify a style in MS Word, I've created a step-by-step tutorial: How To Adjust The Paragraph Settings Of A Style In MS Word.

Okay, back? Everyone knows how to change the paragraph settings of a style? Great! Let's do it.

Changing the paragraph settings of the Normal style


The first thing I do is make sure that my Normal style is set to what I call my Default settings. Here they are:

How To Format A Word Document For Uploading To Amazon: Word Styles
Figure 1: Click to enlarge

In case the image isn't coming through I'll type them in here as well:

Paragraph settings:
Indentation: Left: 0"; Right: 0"
Spacing: Before: 0pt; After: 0 pt
Special: None
Line Spacing: Single
All the other styles we're going to use are built up from the Normal style so it's important we have it just the way we want it.


Creating Our Own Styles


Now comes the fun part! We get to create our own styles based on the Normal style.

If you don't know how to create a style in MS Word that's fine. I've put together a step-by-step tutorial that walks you through this. It has oodles of pictures. You can get to it by clicking here: How To Create A Paragraph Style In MS Word.

myBodyText


This is the style I use for all the text in my manuscript. I base it on the Normal style then adjust these settings (see Figure 2):
Special: First line: By 0.3"
Spacing: After: 6 pt
How To Format A Word Document For Uploading To Amazon: Word Styles
Figure 2: Click to enlarge

Click OK and you're done!

mySpacer


I use "*  *  *  *" to separate scenes and I like to leave one blank line above it and one blank line after it. But, rather than actually use a blank line I do this with styles. Here's how.

Just like we did for our myBodyText style, create a new style and call it "mySpacer" (or whatever you'll find memorable). For myBodyText we left no space above and only 6pt below each paragraph. Now, though, we want to leave 12pt before the paragraph and 12 pts after. Also, we center the style (see Figure 3).

How To Format A Word Document For Uploading To Amazon: Word Styles
Figure 3: Click to enlarge

Click OK and you've created your second style.

I'm going to pick up the pace now since you're familiar with creating and modifying styles.

myTitle


Create another style, call it myTitle (or whatever you'd like). We're going to use this style to format the title of our book.

(Tip: Make sure you're basing these styles on your Normal style, the one we modified at the beginning of this tutorial.)

Here are the changes I make:

a. Increase the font size two points
I use Times New Roman 12 point for my Normal style so I'll increase the font size here to 14 pt. You may want your title to be even larger, and that's fine. Experiment. You might want to italicize your title, or make it bold. Play around, find out what looks good to you.

b. Center the style.

myCenter

You might wonder why you couldn't just center your text without using a style. I've found that when I do as much formatting as possible through my custom styles, things go more smoothly.

This one is easy, just create a new style, call it whatever you want--I use "myCenter"--and make sure that you center align the text.

myHeader


This is the last one! This will help your document headers come out the way you intend.

Creating this style is falling-off-a-log easy because you've just done it for myCenter. You might wonder why bother to create a new style for myHeader when it's exactly the same as myCenter. Here's why: You might want to do something unique to your header that you don't want communicated to everything you've centered.

For instance, let's say you want your header in bold or you want to decrease the font size. If you were using myCenter for this then those changes would be communicated to every paragraph you'd used that style for. And that probably wouldn't be something you'd want.

It may seem odd at first, but I try to create a new style for every function, ever kind of thing I want to do. You may end up with two or three more styles but, over the long run, I've found it sames me a lot of work.


How To Format A Header For Your Manuscript in MS Word


Oh, one more thing!

You all probably know how to do this already but, just in case you don't, I also want to talk about how to format your headers so that you have that nice name-on-one-side-of-the-page, title-on-the-other look (see Figure 4).

How To Format A Word Document For Uploading To Amazon: Word Styles
Figure 4: Click to enlarge
But that's another tutorial and this post is long enough, so I'll direct you here: How To Format A Manuscript Header Using MS Word: Name On One Side, Title On The Other.

I hope you've gotten something out of this decidedly 'unwriterly' tutorial. Tomorrow when I continue this series on how to format an MS Word document and upload it to Amazon I'll pull everything together and show you my 'master template'.

Other articles you might like:

- How To Format A Word Document For Uploading To Amazon
- The Starburst Method: Discovering Your Characters
- The Starburst Method: What It Is And What It Can Do

Photo credit: "Here comes the sun..." by chantrybee under Creative Commons Attribution 2.0.

How To Format A Manuscript Header Using MS Word: Name On One Side, Title On The Other


How To Format A Manuscript Header Using MS Word


I used MS Word 2007 for this tutorial.

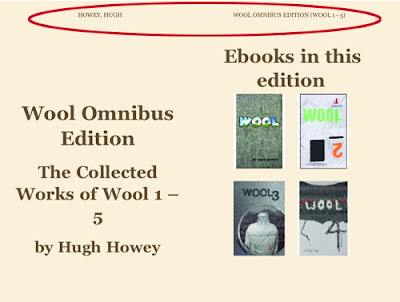
Just in case this is clear as mud, here's an example of what I'm talking about:

How To Format A Manuscript Header Using MS Word: Name On One Side, Title On The Other
Click to enlarge

We want the author's name on the left side and the title of the book on the right.

Formatting Your Manuscript Header In MS Word 2007


1. Make the headers different for odd and even pages


a. Click the "Insert" tab on the ribbon and then click "Header" (see Figure 1).

How To Format A Manuscript Header Using MS Word: Name On One Side, Title On The Other
Figure 1: Click to Enlarge

b. Click "Edit Header" at the bottom of the menu (see Figure 2).

How To Format A Manuscript Header Using MS Word: Name On One Side, Title On The Other
Figure 2

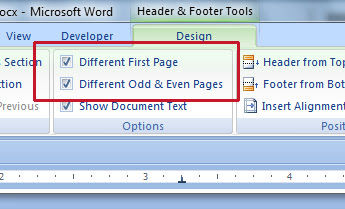
c. Select "Different First Page" and "Different Odd & Even Pages" (see Figure 3).

How To Format A Manuscript Header Using MS Word: Name On One Side, Title On The Other
Figure 3

Don't close the header yet!

2. Type in the headers for the odd and even pages


a. On the header for page 2 type the authors name, last name first and first name last. For example:

Doe, Jane
If there is more than one author:

Doe, Jane; Smith, Michael

b. On page 3 type the title of the book.

c. Select "Close Header and Footer"

That's it!

Update (Jan 6, 2013): 
I've run into a glitch. I've found that MS Word can be cantankerous when it comes to Headers. Sometimes I'll have the "Show different first page" option checked, delete the header on the first page, but instead of it only being removed from the first page it'll also be deleted from the rest of the odd pages.

Here's a work around. Make your first page--your title page--a different section by inserting a "different page" section break. Get into the header (if you're in Print Layout just double-click in the header) and make sure that, for both the odd and even pages, "Link to Previous" is NOT selected.

That should fix it.

Other articles you might be interested in:

- How To Adjust The Paragraph Settings Of A Style In MS Word
- How To Create A Paragraph Style In MS Word
- How To Modify A MS Word Paragraph Style

How To Adjust The Paragraph Settings Of A Style In MS Word


How To Adjust The Paragraph Settings Of A Style


All information in this tutorial applies to MS Word 2007.

a. Bring up the window named Modify Style. (I talk about how to do this here: How To Modify A MS Word Paragraph Style.)

b. There is a button named "Format" in the lower left corner of the Modify Style dialog box (see Figure 1). Press the button.

How To Adjust The Paragraph Settings Of A Style In MS Word
Figure 1: Click to enlarge

c. From the dropdown list select "Paragraph" (see Figure 2)

How To Adjust The Paragraph Settings Of A Style In MS Word
Figure 2: Click to enlarge

d. You should now see the Paragraph window (see Figure 3). 

How To Adjust The Paragraph Settings Of A Style In MS Word
Figure 3: Click to enlarge

That's it!

Other articles you might like:
- How To Create A Paragraph Style In MS Word
- How To Modify A MS Word Paragraph Style

How To Create A Paragraph Style In MS Word


How To Create A Paragraph Style In MS Word


a. On 'the ribbon' you'll see an area marked "Styles", click on the arrow in the lower right corner (see Figure 1).

How to create a paragraph style in MS Word
Figure 1: Click to enlarge

b. This will bring up the Styles window (see Figure 2).

MS Word 2007 Styles Window
Figure 2: Click to enlarge

c. On the bottom right of the Styles Window there is a button with what looks like a double "A" on it (see Figure 3). That is the New Style button. Click it.

Figure 3: Click to enlarge

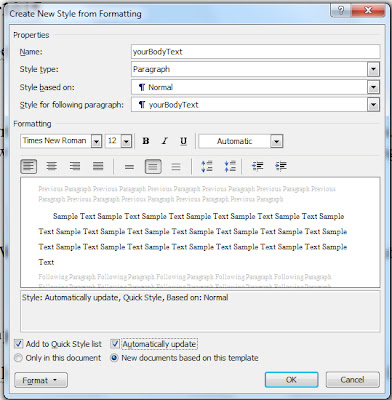
d. This will bring up the window: Create New Style from Formatting (see Figure 4). That's it!

Create New MS Word Style
Figure 4: Click to enlarge

Other articles you might like:

- How To Modify A MS Word Paragraph Style

How To Modify A MS Word Paragraph Style

How To Modify A MS Word Paragraph Style

Two Ways To Modify A Paragraph Style


This information pertains to MS Word 2007.

Modifying an existing paragraph style is easy. There are two ways you can so this.


1. First way to modify a paragraph style:


a. Go to the "Home" tab on the ribbon, find the "Styles" area.

b. Click the arrow in the lower right-hand corner. This will bring up the Styles Window (see Figure 1).

MS Word Styles
Figure 1: Click to enlarge

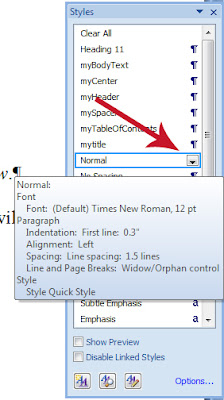
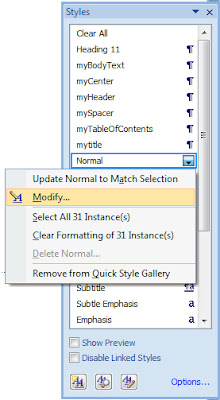
c. Hover the mouse pointer over the style you wish to modify. A down-facing arrow will appear on the far right (See Figure 2).

Modifying MS Word Styles
Figure 2: Click to enlarge

d. Click the down-facing arrow and select "Modify" (See Figure 3).

Modifying MS Word Styles
Figure 3: Click to enlarge

That's it!


2. Second way to modify a paragraph style:


a. Go to the "Home" tab on the ribbon, find the "Styles" area.

b. Hover your mouse over the style you wish to modify and right click on it.

c. A menu will appear. Select "Modify".

That's it!

Photo credit: "Tagging: Maldives Style" by nattu under Creative Commons Attribution 2.0.